커맨드 패턴

GoF의 디자인패턴 중 행동의 커맨드 패턴을 Java 로 정리한 글

요청을 캡슐화 하여 호출자(invoker)와 수신자(receiver)를 분리하는 패턴

요청을 호출하는 쪽과 수신하는 쪽을 커맨드 객체를 사용해서 디커플링하여 분리시키는게 핵심이다.

요청을 처리하는 방법이 바뀌더라도, 호출자의 코드는 변경되지 않는다.

코드를 통해 실제로 필요한 상황을 알아보자.

1. 코드로 알아보는 커맨드 패턴 필요한 상황

클라이언트 요구사항은 다음과 같다.

  1. 버튼을 누르면 전등이 켜지는 객체가 필요해요.

2-1. 버튼을 누르면 행동에 대한 여러가지 기능

클라이언트가 버튼을 누르는 행위를 하면 전등이 켜지는 기능을 제공하면 된다,

Client 호출 코드 (main 함수)

public class Client {
    public static void main(String[] args) {
        Button button = new Button(new Light()); // 정의해야할 버튼 객체
        button.press(); // 전등이 켜지는 기능
    }
}

해당 기능을 완성하기 위한 Button 객체는 다음과 같다.

Button 클래스

  • Light 객체를 통해서 버튼이 눌렸을때 불을 끄는 기능

public class Button {

    private Light light;

    public Button(Light light) {
        this.light = light;
    }

    public void press() {
    	// 전등이 켜지는 함수 호출
        light.on();
    }
}

Light 클래스

  • 전등이 켜지는 기능을 제공

public class Light {
    public void on() {
        System.out.println("전등을 켭니다.");
    }
}

클라이언트가 요구사항을 추가하거나 변경했을 때 코드를 수정해야하는 비효율이 발생하게 된다.

클라이언트 요구사항 추가/변경

  1. 버튼을 누르면 전구를 끄는 기능으로 바꿔주세요.

  2. 새로운 버튼을 만드는데, 이번에는 경찰에 신고가 되는 기능을 개발해주세요.

2번 요구사항은 클라이언트 코드가 변경되지 않지만, Button(호출자=Invoker) 객체의 press 함수의 코드 자체를 변경해줘야하고, 이에 따른 Light 객체 기능도 추가해주면 된다.

public class Button {
	... 생략
   
    public void press() {
        // light.on();
        light.off();
    }
}

public class Light {

    private boolean isOn;

    public void on() {
        System.out.println("전등을 켭니다.");
        this.isOn = true;
    }

	// 추가
    public void off() {
        System.out.println("전등을 끕니다.");
        this.isOn = false;
    }

    public boolean isOn() {
        return this.isOn;
    }
}

3번 요구사항을 만족하기 위해, 새로운 클라이언트 코드를 작성하면 main 함수의 코드가 중복되게 되는 비효율이 발생하게 된다.

// 새로운 클라이언트 코드 작성
public class NewClient {
    public static void main(String[] args) {
        NewButton button = new NewButton(new Police());
        button.press();
    }
}

// 새로운 버튼 기능 코드 작성
public class NewButton {
    private Police police;

    public NewButton(Police police) {
        this.police = police;
    }

    public void press() {
        police.callPolice();
    }
}

ClientNewClien은 같은 행위(버튼을 누른다)에 대해 서로 다른 작업을 하지만, 코드가 거의 유사하다.

따로 따로 비교한 코드를 보면 더욱 직관적이라 묶어서 보면 아래와 같다.

public class Client {
    public static void main(String[] args) {
        Button button = new Button(new Light());
        button.press(); // 전등이 켜지는 기능
    }
}

public class NewClient {
    public static void main(String[] args) {
        NewButton button = new NewButton(new Police());
        button.press();
    }
}
public class Button {
    private Light light;

    public Button(Light light) {
        this.light = light;
    }

    public void press() {
        light.on();
    }
}

public class NewButton {
    private Police police;

    public NewButton(Police police) {
        this.police = police;
    }

    public void press() {
        police.callPolice();
    }
}

실제 기능을 하는 Receiver 객체(Light - Police)만 다르고, 버튼을 누르는 행위는 같은 것을 알 수 있다.

이는, Invoker(호출자=Button)와 실제 기능을 하는 Receiver(Light, Police)의 결합도(coupling)가 높기 때문에 직접적으로 사용하기 때문이다.

헹동 패턴은 책임을 분산해서 의존성, 결합도를 낮추어 구조를 개선할 수 있다.

커맨드 패턴을 활용하여 요청 자체를 캡슐화해서 커맨드 내부에서 수신자(Receiver)가 누구인지 결정하고, 어떤 기능을 해야하는지, 어떤 파라미터가 필요한지 정의해서 제공하면 된다.

커맨드 패턴의 구조를 먼저 알아보자.

2-2. 커맨드 패턴 구조
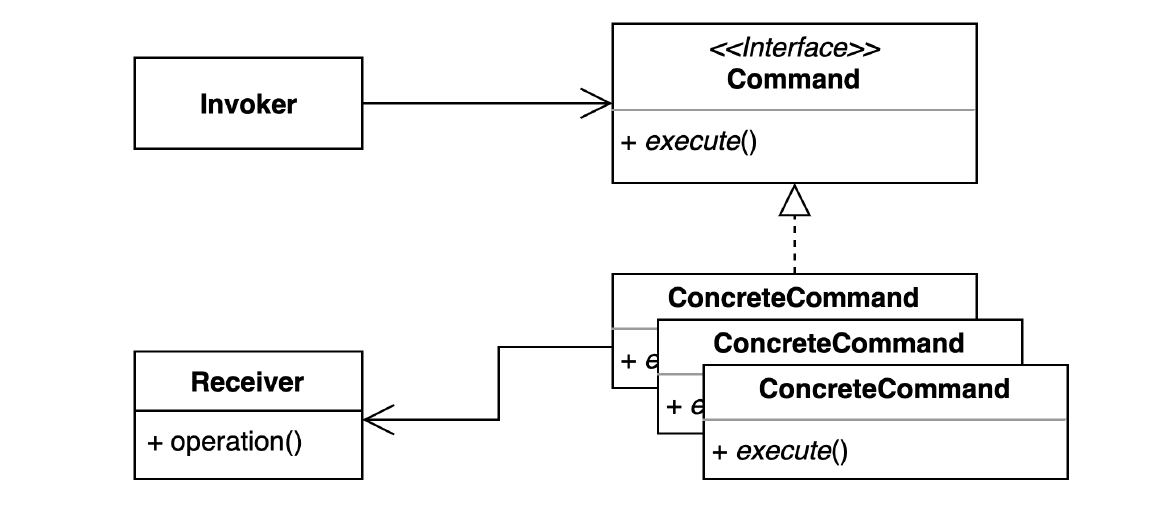
  • Invoker (Button)

    • Command 에서 제공하는 메소드를 실행한다.

    • 주로 execute() 메소드를 호출하고, 경우에 따라 undo() 와 같은 메소드도 사용할 수 있다.

  • Command

    • 구체적인 커맨드를 추상화 시킨 인터페이스

    • Interface 또는 abstract 로 선언한다.

  • ConcreteCommand

    • 구현체, 상속받은 클래스

    • 실제로 어떤 Receiver를 사용할지, 요청에 대한 작업을 수행하는 메소드와 파라미터가 필요한지 구현

  • Receiver (Light & Police)

    • 실제 요청에 대한 작업을 수행

Command 를 재사용할 수 있는 장점이 있고, Command를 로깅한다거나, undo 등 추가적인 작업을 관리하기 쉬워진다.

2-3. 커맨드 패턴 적용

위에서 살펴봤던 3번 요구사항을 만족하는 두개의 클라이언트의 중복 코드가 발생하는 구조를 개선해보자.

행동 패턴 중 하나인 커맨드 패턴을 적용하여 클라이언트(Invoker)와 실제 기능을 하는 Receiver의 결합을 분리하면 된다.

먼저 Command 인터페이스를 작성해보면 아래와 같다.

Command 인터페이스

public interface Command {
    void execute();
}

Command 인터페이스를 활용하는 Invoker인 Button 클래스도 재정의해보자.

Button 클래스

public class Button {
    private Command command;
    
    public Button(Command command) {
        this.command = command;
    }    
    
    public void press() {
        command.execute();   
    }
}

Button은 Command 인터페이스의 execute만 실행하도록 작성했다,

Client 코드

public class Client {
    public static void main(String[] args) {
        Button button = new Button(new Command() {
            @Override
            public void execute() {
            }        
        });
        
        button.press();
    }
}

클라이언트 코드를 보면 Button에 특정 Command를 넣어주고, 버튼을 누르는 행위만 존재하는 것을 알 수 있다.

다른 이야기지만, Lamda와 Method reference를 활용하면 코드가 줄어들고, 가독성이 좋아질 수 있다.

beforeButton button = new Button(new Command() {
	@Override
	public void execute() {
	}});

LamdaButton button = new Button(() -> {});
// Method referenceButton 
button = new Button(Client::execute); // execute 정의해야 함

다음으로, 버튼을 누르는 행위에 대한 실제 기능을 담당할 ConcreteCommand를 구현해보자.

LightOnCommand 클래스, LightOffCommand (전등을 켜고, 끄는 커맨드)

Light 클래스는 위에서 선언했던 코드를 그대로 사용하면 된다.

public class LightOnCommand implements Command {
    private Light light;
    public LightOnCommand(Light light) {
        this.light = light;   
    }    
    
    @Override    public void execute() {
        light.on();
    }
}

public class LightOffCommand implements Command {
    private Light light;
    public LightOffCommand(Light light) {
        this.light = light;
    }    
    
    @Override
    public void execute() {
        light.off();    
    }
}

이제 클라이언트는 전등을 켜는 기능을 하려면 다음과 같이 Command 를 넘겨주면 된다.

public class Client {
    public static void main(String[] args) {
        Button button = new Button(new LightOnCommand(new Light()));
        button.press();    
    }
}

Command가 바뀌는 대신, Invoker 인 Button 코드를 변경할 필요가 없어졌다! 버튼을 누르는 행위에 대한 Command 실행을 추상화했기 때문이다.

이전에는 Command의 코드가 바뀌지 않았고, 커맨드 패턴을 적용하면 Invoker 코드가 바뀌지 않는다.

이를 통해 얻을 수 있는 장점은, 위에서 살펴봤던 요구사항 2번과 같은 상황에 Receiver(전등을 키고, 경찰을 부르는 등의 기능) 코드가 바뀌면 Command는 바뀔 수 밖에 없을 때, 호출자는 바꾸지 않아도 된다.

한마디로, 기존에는 Receiver가 바뀌면 모든 호출자(Invoker)의 코드도 함께 변경해야하는 이슈가 사라진 것이다.

또 요구사항 3번과 같은 상황에 새로운 Client가 생성되더라도, Command 인터페이스를 재사용할 수 있다.

명령을 수행하기 위한 모든 작업을 커맨드 인터페이스로 캡슐화하고, 호출자(Invoker)는 커맨드의 execute만 호출하면 된다.

요청을 처리하는 방법이 바뀌더라도, 호출자의 코드는 변경되지 않도록 하는게 핵심이다.

2. 장점과 단점

장점

  1. 기존 코드를 변경하지 않고 새로운 Command를 만들 수 있음. (OCP 원칙)

  2. 수신자(Receiver)의 코드가 변경되어도, 호출자(Invoker)의 코드는 변경되지 않음. (단일책임원칙)

  3. Command 객체를 로깅, DB에 저장, 네트워크로 전송하는 등 다양한 방법으로 활용 가능.

단점

  1. 코드가 복잡하고 클래스가 많아진다.

3. Java와 Spring에서 사용된 커맨드 패턴

3-1. Java

사실 위에서 작성했던 Command 인터페이스를 쓰지 않아도 Java의 Runnable 인터페이스를 사용해도 된다.

Runnable 인터페이스

ExecutorService를 통해 Thread pool을 3개 생성하고 비동기적으로 함수를 실행할 수 있다.

public class CommandInJava {
    public static void main(String[] args) {
        Light light = new Light();
        Police police = new Police();
        
        ExecutorService executorService = Executors.newFixedThreadPool(3);
        executorService.submit(light::on);
        executorService.submit(police::callPolice);
        executorService.submit(light::off);
        executorService.shutdown();
    }
}

Runnable의 구현체를 위에서 잠깐 언급했던 method reference로 변경해서 작성한 내용이다. Runnalbe의 run은 커맨드이다.

method reference의 변경하기 전 Runnable 코드는 아래와 같다.

executorService.submit(light::on);// before
executorService.submit(new Runnable() {
    @Override    public void run() {
        light.on();    
    }
});

3-2. Spring

Spring은 SimpleJdbcInsert 클래스에서 Insert 쿼리를 만들기 위한 커맨드를 제공한다.

public class CommandInSpring {
    private DataSource dataSource;
    public CommandInSpring(DataSource dataSource) {
        this.dataSource = dataSource;
    }    
    
    public void add(Command command) { 
        SimpleJdbcInsert insert = new SimpleJdbcInsert(dataSource) 
            .withTableName("command")  
            .usingGeneratedKeyColumns("id");   
        
        Map<String, Object> data = new HashMap<>();
        data.put("name", command.getClass().getSimpleName());
        data.put("when", LocalDateTime.now());  
        insert.execute(data);
    }
}

insert 쿼리를 실행하기 위한 커맨드 Object이고, Object를 만들기 위한 편의성 메소드를 제공해서 execute를 실행해서 어떤 컬럼에 어떤 데이터를 어떻게 넣을지 쿼리를 만들어준다.

4. 커맨드 패턴 응용해보기

위에서 알아본 커맨드 패턴을 이용해 Stack을 만들어 명령을 쌓은 후 되돌리거나 재실행하는 등의 방법으로 응용할 수 있습니다.

커맨드 인터페이스 / 클래스

public interface Command {
    public void execute();
    public void undo();
}

public class CopyCommand implements Command{
    @Override
    public void execute() {
        System.out.println("복사 실행");
    }

    @Override
    public void undo() {
        System.out.println("복사 실행 취소");
    }
}

public class CutCommand implements Command {
    @Override
    public void execute() {
        System.out.println("잘라내기 실행");
    }

    @Override
    public void undo() {
        System.out.println("잘라내기 실행 취소");
    }
}

public class PasteCommand implements Command {
    @Override
    public void execute() {
        System.out.println("붙여넣기 실행");
    }

    @Override
    public void undo() {
        System.out.println("붙여넣기 실행 취소");
    }
}

public class SaveCommand implements Command {
    @Override
    public void execute() {
        System.out.println("저장 실행");
    }

    @Override
    public void undo() {
        System.out.println("저장 실행 취소");
    }
}

컴포넌트 인터페이스 / 클래스 (리시버)

public interface Component {
    public Command getCommand();
}

public class Button implements Component{
    private final Command command;

    public Button(Command command) {
        this.command = command;
    }

    public Command getCommand() {
        return this.command;
    }
}

public class Keyboard implements Component{
    private final Command command;

    public Keyboard(Command command) {
        this.command = command;
    }

    public Command getCommand() {
        return this.command;
    }
}

히스토리 클래스

히스토리 클래스는 명령을 쌓을 수 있게 제어하는 클래스 입니다.

public class History {
    private final Deque<Component> history = new ArrayDeque<>();

    public void push(Component b) {
        history.addLast(b);
    }

    private Component pop() {
        return history.pollLast();
    }

    public Component peek() {
        return history.peekLast();
    }

    public void redo() {
        Component component = peek();
        assert component != null;
        component.getCommand().execute();
        push(component);
    }

    public void undo() {
        Component component = pop();
        assert component != null;
        component.getCommand().undo();
    }

    public boolean isEmpty() {
        return history.isEmpty();
    }
}

클라이언트


public class Editor {
    static History history = new History();

    public static void main(String[] args) {
       execute(new Button(new CopyCommand()));
       execute(new Button(new CutCommand()));
       execute(new Button(new PasteCommand()));
       execute(new Keyboard(new SaveCommand()));
       execute(new Keyboard(new PasteCommand()));

        //명령 취소
        history.undo();

        //마지막 명령 재실행
        history.redo();
    }

    private static void execute(Component component) {
        component.getCommand().execute();
        history.push(component);
    }
}

// 실행 결과
복사 실행
잘라내기 실행
붙여넣기 실행
저장 실행
붙여넣기 실행
붙여넣기 실행 취소
저장 실행

Last updated